J'ai fait cette pièce dans le cadre d'un événement appelé One Room Challenge . J'ai pensé cette semaine que je parlerais un peu du processus de conception et de construction de cet espace pour vous donner une idée de ce qu'implique un espace de pseudo-cuisine du point de vue de la conception. Il y a plein de pièces mobiles. Je veux d'abord parler de l'éclairage car il y a de grosses erreurs que vous pouvez faire lors du choix, et souvent nous ne voyons pas les luminaires en personne jusqu'à ce qu'ils arrivent. Ensuite, vous trouverez un guide d'exécution de la conception. Mais d'abord, puisque je ne les ai pas mentionnés la semaine dernière, je vais parler des appareils de plomberie que j'ai choisis du sponsor, Signature Hardware.

matériel de signature
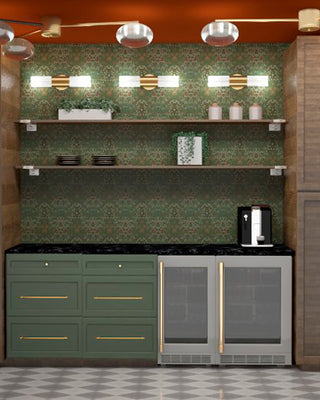
J'ai fini par choisir d'utiliser des robinets chromés parce que nous avons actuellement du chrome dans la cuisine, et bien que je ne sois pas dans le matchy matchy, j'ai décidé dans ce cas de rester cohérent. Ne me faites pas confiance pour rester constant dans les métaux. Notez les luminaires dorés et noirs, et comptez sur moi pour utiliser également un autre type de quincaillerie d'armoire.
Nous avons obtenu le support monotrou Aiken avec un pulvérisateur à main qui ira dans un deuxième trou. Nous aurons un système d'osmose inverse pour l'eau sous cet évier, nous utiliserons donc le distributeur d'eau Micah au même évier. Et pour l'évier, j'ai opté pour un évier en acier inoxydable de 15 "en noir de pistolet, l'Atlas. J'ai choisi 15" parce que je voulais économiser de l'espace de comptoir dans cette pièce, et j'ai senti que le noir de pistolet aurait l'air élégant comme un moderne contraste avec les comptoirs en stéatite d'aspect rustique.
Comment choisir les luminaires
- Plafonds cathédrale ou voûtés. Lorsque vous choisissez un luminaire pour un plafond voûté (c'est-à-dire un plafond incliné), vous devrez réfléchir à l'appareil auquel le luminaire est suspendu. Par exemple, une tringle sur un plafond incliné ne fonctionnera pas à moins que vous n'ayez une solution alternative car la tringle dépasserait bien sûr en biais. Il est préférable de choisir une pièce qui pend sur un fil ou une chaîne lâche. Cela dit, il EST possible de suspendre un luminaire à tringle à un plafond incliné. Dans notre cuisine, nous avons construit une petite boîte pour suspendre le luminaire. La boîte crée une surface plane parallèle au sol sur laquelle le luminaire peut être suspendu. Il était un peu difficile de comprendre les angles, mais nous avons construit un cadre en bois et l'avons recouvert de cloisons sèches et peint pour correspondre au plafond incliné. Une autre solution est un morceau de matériel appelé adaptateur de plafond incliné. Le problème avec cela est de faire correspondre le matériel au luminaire, et souvent les spécifications ne vous donnent pas les informations pour faire correspondre des pièces comme celle-ci ET elles peuvent annuler les garanties d'éclairage. Il serait peut-être préférable de commencer avec un luminaire qui fonctionne correctement pour le plafond lui-même, à mon avis. Plutôt, du point de vue de mon mari car c'est lui qui a dû gérer le choix que j'ai fait.
- Balance encastrée. En pieds, additionnez la largeur et la longueur de la pièce, puis convertissez en pouces. Ce sera la largeur approximative de votre montage encastré. Pour une pièce de 12 'x 12', vous auriez besoin d'un montage encastré d'environ 24 ". Cela dit, je pense que c'est une règle que je plierais dans le sens d'un montage encastré plus grand en fonction du look que je recherche.
- Largeurs des luminaires sur les tables. La règle d'or ne dit pas plus de 3/4 de la largeur de la table. Je vais aller de l'avant et plier celui-ci à pas plus que la largeur de la table à condition qu'il soit au-dessus du sol de 6,5 '.
- Hauteur au-dessus des tables. Environ 36". Je plierais cela à plusieurs reprises. Tout d'abord, regardez... voulez-vous voir quelque chose au-delà du lustre, comme une fenêtre ou un élément architectural ? Ensuite, accrochez-le au-dessus de ce 36". Bien que je n'irais pas en dessous de 36 ", vous pouvez bien sûr avoir une conversation à table.
- Dimensionnement de l'applique. Toujours mesurer à des fins d'espacement. Cela variera d'une application à l'autre. Mais toujours toujours mesurer votre espace. Si possible, faites une maquette à la taille.
- Hauteurs suspendues. Assurez-vous de toujours vérifier les spécifications d'éclairage pour voir si la hauteur de suspension peut être modifiée. Y a-t-il des choix de tiges que vous devez faire à l'avance pour que votre lustre soit suffisamment bas ? Assurez-vous de lire les spécifications et de toujours savoir ce que vous obtenez.
Un guide d'exécution de la conception
- Recueillez des images qui vous parlent pour l'ambiance générale de l'espace. J'ai utilisé ces images pour créer un tableau d'ambiance pour l'espace. Je suis allée sur Pinterest, mais j'ai aussi parcouru des livres sur le textile et le design. Pinterest a tendance à faire remonter à la surface les contenus les plus populaires. Et je ne veux certainement pas faire ce qui est le plus populaire. Donc, pour rester plus fidèle à ma véritable philosophie de conception, j'essaie de m'éloigner des médias sociaux.
- Faites le point sur la pièce elle-même. Je l'ai mesuré, bien sûr, mais j'ai aussi regardé où se trouvent actuellement les points de vente, où il y a de la plomberie en place et où je peux déplacer ces choses. Je regarde ce qui pourrait être plus difficile à changer et ce qui pourrait être plus facile.
- Ensuite, nous décidons des choses que nous allons bricoler et de celles qui doivent être prises en charge par des professionnels. J'ai parlé à un entrepreneur agréé de confiance de nos besoins en électricité et en plomberie. Il savait quel était le niveau de compétence de mon mari et m'a dit que les choses que nous devions faire n'ajoutaient pas à la charge sur le tableau ou à la plomberie, mais plutôt simplement au déplacement de ce qui existait afin que ce ne soit pas un problème de permis. En fin de compte, les décisions ont été prises en fonction du niveau de compétence ainsi que du temps et de la main-d'œuvre nécessaires.
- Déménagement de toute plomberie et électricité existantes et installation de nouveaux robinets, éviers et luminaires. (Mon mari a travaillé dans la construction et sait ce qu'il fait à ce niveau, nous nous sentons donc en sécurité pour faire ces articles. Veuillez ne pas le faire uniquement en vous basant sur des vidéos YouTube et vérifiez toujours si vous avez besoin d'un permis.)
- Démo
- Réparation de cloisons sèches, peinture et pose de papier peint
- Le carrelage fonctionne parce que c'est une installation simple
Ce que nous ne faisons pas nous-mêmes :
- Construction et installation d'armoires. Nous avons décidé de ne pas nous charger de cela simplement à cause du temps et de la main-d'œuvre nécessaires pour le faire.
- Pose de comptoir
4. Choisissez les finitions. Vous devez choisir les finitions avant d'aménager votre espace. Vous devez connaître la largeur de l'évier que vous utiliserez, les tailles de tous les appareils et les tailles de tous les appareils. Bien sûr, vous voudrez également choisir vos finitions décoratives comme le papier peint et continuer à commander ces articles. N'oubliez pas de toujours commander des échantillons. Souvent, vous verrez quelque chose en personne et l'échelle ou la couleur est différente de ce que vous avez pu supposer en ligne. Je recommande également qu'avant de concevoir, vous n'ayez pas seulement choisi vos articles, mais également passé des commandes afin que vous sachiez que les choses que vous voulez sont disponibles. Surtout en ce moment. Vous savez probablement qu'en raison de la pandémie, il y a beaucoup de choses qui sont en rupture de stock. Je sais que la machine à glaçons que j'ai commandée ne sera pas en place avant la fin du défi d'une pièce et je dois juste vivre avec l'idée qu'elle ne sera pas totalement terminée à temps. Je veux ce que je veux, alors j'attendrai.
5. Utilisez les mesures pour aménager l'espace. Selon le type d'armoires, les largeurs sont standard par incréments de 3" à partir de 12", me dit-on. J'ai utilisé une grille pour disposer les armoires et en utilisant les spécifications de l'appareil et des éviers, j'ai quadrillé la pièce. Vous aurez besoin d'avoir 2" de chaque mur dans un projet comme le nôtre pour que les portes s'ouvrent. Et n'oubliez pas de tenir compte de toutes les portes qui s'ouvrent comme les portes du réfrigérateur. Comme je l'ai mentionné dans mon post précédent, mon amie, Lydia de Lydia Anderson Designs a également fait une mise en page en grille et une mise en page de face en fonction de ce que je lui ai donné. Comme elle fait des armoires tout le temps, je lui fais confiance pour s'assurer que j'ai tout fait correctement et vraiment pour superviser la partie armoire du projet Nous ne savons toujours pas avec qui nous allons fabriquer et installer les armoires en fonction de plusieurs facteurs : qualité, prix et emplacement du menuisier. Nous en reparlerons plus tard. Attendez les trois prochaines étapes pour commander vos armoires. étapes sont terminées si possible.
6. La démo peut commencer pendant que ce qui précède est en cours. Cependant, il est préférable d'avoir un espace dégagé, afin que les mesures puissent être précises. Par exemple, les murs ne sont souvent pas complètement d'aplomb. Un bon menuisier tiendra compte de tout cela et les finitions pourront être tracées. Dans le meilleur des cas, le scénario comprend une démonstration, le placement de tous les équipements électriques et de plomberie, puis la pose de cloisons sèches avant de passer une commande finale d'armoires. Ce sont les armoires qui doivent être bien ajustées.
7. Installation de l'électricité et de la plomberie. Une fois la démonstration terminée, le placement de l'électricité et de la plomberie peut être exécuté.
8. Installation de cloisons sèches. Une fois les cloisons sèches installées et les mesures terminées, les armoires peuvent être commandées. À vrai dire, ce n'est pas toujours possible, mais ce serait vraiment la meilleure pratique. Pour ce projet, nous ne l'emmenons pas aux montants, nous aurons donc des réparations, mais pas toutes les nouvelles cloisons sèches. Par conséquent, les armoires seront commandées avant la finition des cloisons sèches. Probablement la semaine prochaine.
9. Peinture. La peinture peut avoir lieu avant l'installation des armoires ou après. Nous avons été déchirés à ce sujet avec tous nos projets. Si vous peignez avant, vous aurez probablement des retouches. Si vous peignez après, vous devrez faire beaucoup de préparation et de ruban adhésif. À toi de voir. Les entrepreneurs à qui j'ai parlé ont également été divisés à ce sujet.
10. Pose de carreaux de sol.
11. Installation d'armoires et d'appareils.
12. Mesure au laser pour les comptoirs.
13. Installation d'évier et de comptoir.
14. Pose de carreaux de dosseret. Remarque : nous avons déjà installé des carreaux de dosseret avant les comptoirs, et c'est possible, mais non recommandé. C'est un bien meilleur ajustement si vous le faites après.
15. Pose de papier peint. Nous sommes un peu déchirés sur l'ordre de cela parce que cela dépend de plusieurs choses. Tout d'abord, les installateurs font parfois couler de la colle sur la nouvelle peinture. Donc, si la peinture est très brillante, vous voudrez peut-être peindre après. La peinture qui rencontrera le papier peint dans ce cas sera la peinture du plafond. Il rencontrera également le dosseret. Tout cela peut être essuyé de colle. Par conséquent, dans ce cas particulier, nous installerons après le dosseret. Ce que je veux dire, c'est que cela peut varier, il est donc important d'y réfléchir.
16. Des étagères flottantes peuvent maintenant être installées si elles dépassent le papier peint.
Mel Remmers
Bari that green is ridiculously good. This whole design is bonkers. Can’t wait to see it!
Sherry Smith
Love everything!! Do you mind sharing the green paint you’ve chosen for the cabinets. I want to use green with my Strawberry Thief paper, but I haven’t found one I really like. Thank you.
Suneiah
Love this! I’m in the process of designing a bijou walk in pantry. I love the option of being able to amp up the design.