I did this room as part of an event called One Room Challenge. I thought this week I'd talk a bit about the process of designing and building this space to give you an idea what a pseudo kitchen space entails from a design standpoint. There are loads of moving parts. First I want to talk about lighting because there are some large mistakes that you can make when choosing, and often we don't see the fixtures in person until they arrive. Next, you will find a design execution guide. But first, since I didn't mention them last week, I'll talk about the plumbing fixtures I chose from sponsor, Signature Hardware.

signature hardware
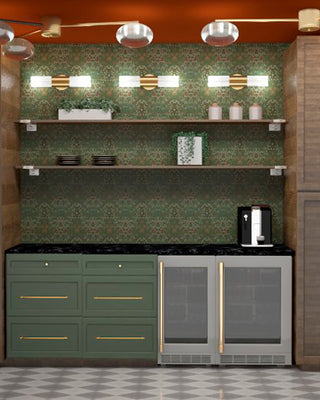
I ended up choosing to go with chrome faucets because we currently have chrome in the kitchen, and though I'm not into matchy matchy, I decided in this case to stay consistent. Don't trust me to stay consistent in metals ever though. Note the gold and black light fixtures, and count on me to use another kind of cabinet hardware as well.
We got the single hole mount Aiken with a hand spray that will go in a second hole. We will have a reverse osmosis system for water under this sink so we will be using the Micah Water dispenser at the same sink. And for the sink, I went with a stainless steel 15" sink in gun metal black, the Atlas. I chose 15" because I wanted to conserve counter space in this room, and I felt the gun metal black will look sleek as a modern contrast to the rustic looking soapstone counters.
How to choose light fixtures
- Cathedral or vaulted ceilings. When picking a light fixture for a vaulted ceiling (aka, one that is slanted), you'll want to think about what apparatus the lighting fixture hangs on. For instance, a rod on a slanted ceiling will not work unless you have an alternate solution as the rod would of course stick out at an angle. It's best to pick a piece that hangs on a loose wire or chain. That said, it IS possible to hang a rod fixture from a slanted ceiling. In our kitchen we built a small box for the fixture to hang from. The box creates a flat surface parallel to the ground for the fixture to hang from. It was a bit tricky to figure out the angles, but we built a frame from wood and covered it with drywall and painted to match the slanted ceiling. Another solution is a piece of hardware called a sloped ceiling adapter. The problem with this is matching the hardware up to the fixture, and often specs do not give you the info to match pieces like this AND they can void warrantees for lighting. It might be best to just start with a fixture that works properly for the ceiling itself, in my opinion. Rather, from my husband's perspective as he was the one who had to deal with the choice I made.
- Flush mount scale. In feet, add together the width and length of the room and then convert to inches. This will be the approximate width of your flush mount. For a 12' x 12' room you would need an approximate 24" flush mount. That said, I think this is a rule I would bend in the direction of a larger flush mount depending on the look I'm going for.
- Widths of fixtures over tables. Rule of thumb says no more than 3/4 of the width of the table. I'm going to go ahead and bend this one to no more than the width of the table provided that it's above the ground by 6.5'.
- Height over tables. Approximately 36". I'd bend this for several instances. First, view... do you want to see something beyond the chandelier such as a window or an architectural feature? Then hang it above that 36". Though I wouldn't go below 36" so you can have conversation at the table of course.
- Sconce sizing. Always measure for spacing purposes. This will vary from application to application. But always always meausure your space. If possible, do a to size mock up.
- Hanging heights. Make sure that you always check lighting specs to see if hanging height can be altered. Are there rod choices you need to make ahead of time so your chandelier hangs low enough? Make sure you read specs and always know what you are getting.
A Design Execution Guide
- Collect imagery that speaks to you for the overall feel of the space. I used this imagery to make a mood board for the space. I did go to Pinterest, but I also looked through textile and design books. Pinterest tends to bring the most popular content to the surface. And certainly I do not want to just do what's most popular. So to keep it more to my true design ethos, I try to veer away from social media.
- Take stock of the room itself. I measured it, of course, but I also looked at where outlets currently are, where there is plumbing in place and where I can move those things to. I look at what might be harder to change, and what might be easier.
- Next we decide what things we will DIY and what should be taken on by professionals. I spoke to a trusted licensed contractor about our electrical and plumbing needs. He knew what my husband's skill level is and told me that the things we need done, aren't adding to the load on the board or to the plumbing, but rather just moving what existed so it's not a permit issue. In the end, decisions were made on skill level plus time and labor needed.
- Moving of any existing plumbing and electrical plus install of new faucets, sinks and light fixtures. (My husband has worked in construction and knows what he is doing on this level so we feel safe doing these items. Please don't do it just based on YouTube videos alone and always check to see if you need a permit.)
- Demo
- Drywall repair, painting and wallpapering
- Tile work because it's a simple install
What we are not doing ourselves:
- Cabinetry build and install. We decided we won't take this on just because of the time and labor needed to do so.
- Countertop installation
4. Pick finishes. You need to pick finishings before you lay out your space. You must know the width of the sink you'll use, sizes for any fixtures and sizes for any appliances. Of course you'll also want to pick your decorative finishes like wallpaper and get on ordering these items. Remember to always order samples. Often you'll see something in person and the scale or color is different than you may have assumed online. I also recommend that before you design, you've not just picked your items but also placed orders so that you know for fact the things your want are available. Especially right now. You probably know that due to the pandemic, there are many things that are out of stock. I do know that the ice maker I ordered will not be in until the end of the one room challenge and I just have to live with the idea it will not be totally finished on time. I want what I want, so I'll wait.
5. Use the measurements to layout the space. Depending on the type of cabinets, widths come standard in increments of 3" starting at 12", I'm told. I used a grid to layout the cabinets and using the appliance and sinks specs I gridded the room. You'll need to have 2" from each wall in a project such as ours so that doors open. And remember to account for all doors that open such as refrigerator doors. As I mentioned in my previous post, my friend, Lydia from Lydia Anderson Designs also did a grid layout and a front facing layout based on what I gave her. As she does cabinets all the time, I trust her to make sure I'd done it all correctly and really to supervise the cabinet part of the project. We are still on the fence as to who we are going with to actually make and install the cabinets based on several factors: Quality, price and location of the carpenter. More on that later. Hold off on ordering your cabinets until the following three steps are complete if possible.
6. Demo can begin while the above is ongoing. However, it's best to have a clear space, so that measurements can be exacting. For instance, walls are often not completely plumb. A good carpenter will take all of that into account and finishes can be scribed. A best case scenario includes demoing, placing all electrical and plumbing and then drywalling before doing a final order of cabinetry. It's the cabinets that need to be well fitted.
7. Installation of electrical and plumbing. Once demo is finished, placement of electrical and plumbing can be executed.
8. Drywall installation. Once drywall is up and measurements are completed, cabinets can be ordered. Truthfully, this is not always possible, but it really would be the very best practice. For this project, we are not taking it to the studs so we will have repairs but not all new drywall. Therefore, cabinets will be ordered prior to finishing the drywall. Likely next week.
9. Painting. Painting can happen before install of cabinets or after. We've been torn on this with all of our projects. If you paint before, you'll likely have touchups. If you paint after, you'll have to do a lot of prep and taping off. Up to you. Contractors I've talked to have been split on this as well.
10. Floor tile installation.
11. Cabinet and appliance installation.
12. Laser measurement for countertops.
13. Sink and counter installation.
14. Backsplash tile installation. Note: we have installed backsplash tile before counters before, and it's possible, but not recommended. It's a much better fit if you do it after.
15. Wallpaper installation. We are a bit torn on the order of this because it's dependent on several things. First, sometimes installers will drip glue on new paint. So if the paint is high gloss, you might want to do paint after. The paint that will meet up with the wallpaper in this case will be ceiling paint. It will also meet up with the backsplash. All of this can be wiped of glue. Therefore, in this particular instance we will install after the backsplash. My point is that this can vary so it's important to think it through.
16. Floating shelves can now be installed if they go over the wallpaper.
Mel Remmers
Bari that green is ridiculously good. This whole design is bonkers. Can’t wait to see it!
Sherry Smith
Love everything!! Do you mind sharing the green paint you’ve chosen for the cabinets. I want to use green with my Strawberry Thief paper, but I haven’t found one I really like. Thank you.
Suneiah
Love this! I’m in the process of designing a bijou walk in pantry. I love the option of being able to amp up the design.