I've been updating this space as part of the One Room Challenge, and again, I want to first thank Linda Weinstein and media partner, Better Homes and Gardens. I'm honored to be a part of this as a featured designer this Spring.
Admittedly, in real time, were are almost finished with the primary bath. This is because we are moving (to Charlotte, North Carolina), so the room had to be finished for sale. It is now under contract, and if all goes as planned, by the last week of the ORC we will be weeks into a lease back period before moving in August. I'll update if anything changes. Cross your fingers.
This week, I'll talk about planning your installation when designing a primary bathroom with a fully gutted room. I'll also talk about a special part of the room that I am particularly excited about. These are the things to think about:
1. Will the layout stay the same, or will you be moving elements around? For our room, the layout is almost the same except we removed some partial walls. If you are moving any walls or removing as we did, make sure those are not load bearing, obviously. The shower is where the shower was, but it is a larger because there was a little alcove in front of it that we made part of the shower. Everything else stayed where it was.
2. Will you be moving any plumbing and electrical? For our room, we needed to move plumbing for the sinks slightly based on the new vanity design, and add spots for vanity lights. We also removed the recessed can that was above the old tub and centered it over the spot for the new tub. The new tub required the drain to be moved slightly and because we added a free standing faucet, that needed to be plumbed as well.
3. What do you need to budget for?
Labor:
- Demo
- Plumbing
- Electrical
- Tiling
- Painting
- counter installation
Materials:
- Tile - We tiled the floor, vanity wall, bathtub surround and shower
- Sinks
- Vanity
- Faucets
- Shower heads
- Any additional lighting - we got a new chandelier, replaced old recessed cans, and added new vanity lights. We also added new lighting to our closet as part of this project.
- Shower door or in our case, glass panel
- Electrical outlets, covers, and boxes
- Vents if your aren't reusing
- Towel bars, rings and hooks
- Miscellaneous plumbing and electrical materials
- Drywall
- counter material
- Toilet if replacing
- Baseboard - in our case nothing in the house has baseboards so we are just installing quarter round
- Any art or decor you are adding
4. The order in which things should be done. In general, this is the order of installation:
- demo
- float floor and waterproof areas that need to be waterproofed
- new electric and plumbing if needed
- drywall and waterproof backer board
- floating vanity can go in before flooring if not floating, after flooring
- If you are tiling the vanity wall, it's best to wait for the countertop to go in. We did not wait, but were told by the countertop company that we needed 1 5/8" over the vanity to start the tile. We ended up needing to adjust the counter upon installation to meet the tile. Not ideal. Wait if you can. We had some tile installation scheduling issues so we plowed ahead.
- Sinks are installed with the countertop and then faucets can be installed.
- Once all tile is installed, we found it best to have the room painted before installing lighting, tub and toilet. That way a painter doesn't need to work around large items like the tub and try to get behind a toilet.
- After paint, you can install your pre-painted baseboard, light fixures, tub and toilet and of course the shower door.
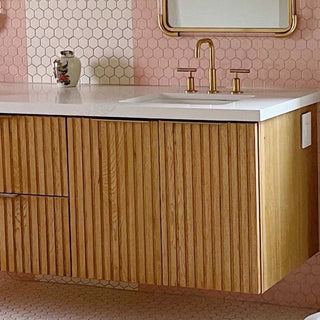
As I mentioned, I'd also like to talk about a special part of the design that I'm crazy about, the vanity. I wanted a fluted front, floating vanity. I was looking for vertical lines to contrast the circlular shapes in the room. After looking at tons of finished vanities online, we realized the largest finished size we could obtain in a timely manner was about 72" and it wouldn't be fluted as I was looking for. We also needed about 85" long or more. We could have done two smaller vanities, but I didn't want the gap between the two. Luckily, I was able to find a local carpenter who built a vanity to our specifications. It actually turned out to be less expensive and faster than buying a finished one online.
The new vanity is 85" wide and 24" h. It's fronts are solid fluted hickory. As opposed to glued or nailed on slats, the fronts are solid wood that was routed to create the fluting. There are two deep front drawers, and we included electrical outlets on the sides of the vanity. On the sides, we will also be installing towel rings. Below is the sneakiest peek I can give you without giving away more of the room. It's exactly as planned and I'm pretty gah gah over the results.
Tile shown is from sponsor, The Tile Shop:
Faucet Shown is from Sponsor, Build With Ferguson:
Ginger Jar from sponsor, Ebay In future posts you will see that I got A LOT of vintage and new finishing touches from Ebay, and I couldn't be more impressed. I've been a member of Ebay since 2001... 20 years. I'm kind of a big fan.

Thank you for visiting today. Please ask any questions you have below!

Tarah
Hi! I love the cabinet you had built. I’m also in Az. What kind of a budget is needed for the custom cabinet and I’d love any recommendation for who to work with. Thanks!!